Related Posts Plugin for WordPress, Blogger...
Showing posts with label Pysselstafetten. Show all posts

Monday, November 5, 2012

Crafting relay: DIY Paperback and e-book reader covers / Pysselstafetten: Gör-det-själv: Pocketboks- och e-bokläsarfodral


I'm very sorry for this late post - today is my last contribution to the crafting relay, thanks Just go creative for the great post on apple dolls yesterday! I used to make those when I was a kid...

Anyway, what feels better when it's cold and rainy outside than to make oneself comfortable in a sofa corner with a good book? And as I always carry books around, I figured it would be a good idea to make a paperback cover. And, since it's 2012 after all, I made a cover for my e-book reader as well. Are you ready for the tutorial?

Jag är mycket ledsen för detta sena blogginlägg - idag är det mitt sista bidrag i Pysselstafetten, tack Just go creative för inlägget om äppeldockor igår! Jag brukade göra såna när jag var liten, helt kul... 

Hur som helst, vad känns väl bättre när det är kallt och regnigt ute än att krypa upp i soffan med en bra bok? Eftersom jag alltid släpar runt på böcker tänkte jag att det vore en bra idé att göra ett pocketboksfodral. Och, eftersom det är 2012, gjorde jag ett fodral till min e-bokläsare också. Äe ni redo för beskrivning?


1. Do some cross-stitching. Very optional. You could also use just a really nice fabric, glue some sequins on, or do anything else that makes you happy.  /  Brodera lite korsstygn. Mycket valfritt. Du kan också bara använda ett riktigt fint tyg, limma på några paljetter eller göra något annat som gör dig glad.

2. Cut the fabric, 1 inch larger than your book on the top and bottom, and 3,5 inches wider on both sides.  /  Klipp tyget, 2 cm större än boken ovantill och nedertill, och 9 cm bredare på båda sidor.

3. Now you can see what it should look like.  /  Nu kan du se hur det kommer att se ut.


4. Fold 0,2 inches and make a seam along the left and right sides.  /  Vik in 0,5 cm och sy en söm längsmed varje kortsida.

5. Fold and press down 1 inch on top and bottom, then 3,5 inches on each side.  /  Vik och pressa ner 2 cm längs ovansidan och nedersidan, samt vik och pressa in 9 cm på varje kortsida.

6. Now it should look like this (but oops - notice that the picture is upside down! The embroidery should be to the left if looked at like this).  /  Nu ska det se ut så här (men oj - lägg märke till att fotot är upp och ner! Broderiet ska vara till vänster när man ser tyget så här).

7. Sew along the longest sides, that is the top and bottom. I also made a small stitch along the outer sides to the left and right, but that was just for esthetic purposes.  /  Sy längs med långsidorna. Jag sydde också en söm längst ut på kortsidorna, men det var bara för att det skulle se fint ut.

8. I added a bookmark by attaching some of the embroidery floss on the top, and then I simply braided it and added a button at the bottom.  /  Jag gjorde ett bokmärke genom att sy fast några trådar av brodergarnet längst upp, sedan flätade jag det och satte fast en knapp längst ner.


Put the book covers in the fabric "pockets". Now you're done! And now the e-book reader cover. 
Pilla in bokomslaget i tygfickorna på fodralet. Klart! Och nu till e-bokläsarfodralet.


1. This was fun! At first I made the embroidery inspired by the great Karin Holmberg's book Karins broderier. /  Det här var kul! Först broderade jag, inspirerad av den fantastiska Karin Holmbergs bok Karins broderier.

2. This kind of embroidery is called "påsöm", a Swedish traditional embroidery from Dala-Floda. I used leftover wool yarn...  /  Den här typen av broderi kallas påsöm, traditionellt svenskt broderi från Dala-Floda. Jag använde rester av ullgarn... Uppdatering: Här hittar du Karins beskrivning av hur du syr påsöm.

3. I used thick wool fabric, and cut it so that the piece with the embroidery would have the flap on top. That's why that piece is bigger than the other. Use you e-book reader for measure, they are all a bit different. This cover would also be great for an iPad.  /  Jag använde tjockt ulltyg, och klippte det så att broderiet skulle ha ett lock högst upp. Det är därför den biten är större än den andra. Använd din e-bokläsare som mått, de är alla lite olika stora. Det här fodralet skulle också passa fint på en iPad.


5. Seal the edges with blanket stitch.  /  Sy ihop sidorna med langettsöm. 

6. I attached a button on the back as closure.  /  Jag använde en knapp som lås.

7. Done!  /  Klart!

8. A great mix of traditional embroidery and new technology, no?  /  En bra mix av traditionellt broderi och ny teknik, eller hur?
_____


Do skip the embroidery if you think it's too hard, it'll look nice anyway and will certainly be functional. Happy reading!

Skippa broderiet för all del om du tycker det är för svårt, fodralet ser fint ut ändå och kommer absolut att vara funktionellt. Trevlig läsning!


Now it's FridaSofia's turn to take on the crafting relay. Exciting!

Nu tar FridaSofia över i stafetten. Spännande!

Wednesday, October 17, 2012

Crafting relay: DIY Fall Matchboxes | Pysselstafetten: Gör-det-själv: Hösttändsticksaskar


It's time for my second contribution to the crafting relay! And if you've made the tea that Hannas kreativa hörna taught us in the relay yesterday, it's time to take that cup of tea, make yourself cozy in the sofa, watch the rain, and light a candle. And for that, you of course need some fall inspired matchboxes! What else is there to light a fall candle with? I'm just asking.

I have a friend who makes these to use as hostess gifts. It's a great idea, she puts six of the in a small cellophane bag and ties it together with a nice ribbon.

Det är dags för mitt andra bidrag till Pysselstafetten! Och om du gjort teet som Hannas kreativa hörna lärde oss igår, är det dags att göra den där koppen med te, krypa upp i soffan, titta på regnet och tända ett ljus. Och för att kunna göra det behöver du naturligtvis några höstliga tändsticksaskar. Vad kan man annars tända ett höstljus med? Jag bara frågar.

Jag har en kompis som gör sådana här som presenter att ha med när hon går på middag. Det är en helt bra idé, hon lägger sex stycken fint travat i en cellofanpåse och knyter ihop med ett fint band.


The first thing you need to do is to gather all nice crafting things you have. It can be paper, fabric, glitter, color pencils, glue, sequins, pearls, yarn, buttons, etc etc. And some matchboxes of course.

Det första du måste göra är att ta fram alla dina fina pysselsaker. Som till exempel papper, tyg, glitter, färgpennor, lim, paljetter, pärlor, garn, knappar etc etc. Och några tändsticksaskar så klart.


Then everything will look like this for a while.


Sedan ser allt ut så här ett tag.


I picked out these things - some fabrics and sequins...

Jag valde ut några tyger och paljetter...


...and made this. Rowanberries are truly one of the fall-iest trees I know. We have so many around here, and I love the leaves and the red berries.

I just cut a square of the orange fabric to fit the box, and glued it in place. Then I cut the leaves and glued them on. Then the sequins. Last, I took a bit of brown embroidery thread to make the branch. It was a bit tricky to glue in place, but just make sure not to use too much glue and you'll be fine. A nice touch is to glue some nice crafting paper on the bottom of the box.

...och gjorde den här. Rönnbär är ett av de höstligaste träd jag vet. Det finns hur många som helst häromkring, och jag gillar löven och bären.

Jag klippte ut en fyrkant av det orangea tyget och limmade fast det på asken. Sedan klippte jag ut löven och limmade fast dem. Sedan paljetterna. Till sist tog jag en bit brun broderitråd för att göra grenen. Den var lite knepig att få på plats, men bara du inte tar för mycket lim kommer det att gå fint. Snyggt är också att limma lite fint papper på askens undersida.


Then I used the same orange fabric and a nice pearly paper...

Sedan tog jag samma orangea tyg och ett fint pärlemorpapper...


...and made this. Yes, we have a lot of maples around here too (my second favorite fall tree) and yes, I used the Canada flag as a template. But tilted the leaf a bit, so it wouldn't be too obvious.

...och gjorde denna. Ja, vi har många lönnar häromkring också (mitt andra favvohöstträd) och ja, jag använde Kanadas flagga som mall. Men jag lutade lite på lövet så att det inte skulle vara för uppenbart.


Then I took some light blue paper and glued it on top and bottom of a box. On the top I made a cloud out of white paper and rain drops out of some sequins. On the bottom I made an umbrella out of red and black paper.

Sedan tog jag ljusblått papper och limmade på ovan- och undersidan på en ask. På ovansidan gjorde jag ett moln av vitt papper och regn av några paljetter. På undersidan gjorde jag ett paraply av rött och svart papper.


Well, at this point we (my five year old and I) started to feel a little fed up with fall and rain and all, and started to long for summer. To feel better, we made this summery box with a pearly paper underneath, and shells from this summer glued on top. Between the shells we pasted crushed shells (to crush them was A:s favorite part).

Nåja, när vi (min femåring och jag) kommit så här långt var vi hyfsat less på höst och regn och sådant, och vi började längta efter sommaren. För att känna oss bättre gjorde vi den här sommarasken, med ett pärlemorpapper längst ner och snäckskal samlade i somras limmade ovanpå. Mellan snäckorna klistrade vi krossade snäckskal (att krossa dem var A:s favoritpyssel).


I like my matchboxes clean and bright, with quite naive pattern. Do you think they are too simple? Well, A did, and after having tried to make me use more glitter he gave up and took matters in his own hands instead. These boxes will be Christmas presents for our relatives, and he was extremely pleased with how they turned out. 

This is the great thing with this project - it's super easy to make with kids, and you can make the boxes however you like. The sky is the limit - and so on.

Jag gillar att göra mina askar enkla med klara färger och ganska naiva mönster. Tycker ni att de är för enkla? Det gjorde A, och efter att ha försökt få mig att använda mer glitter tog han saken i egna händer. De här askarna ska bli julklappar till släktingar, och han var extremt nöjd med resultatet.

Det är det som är det fiffiga med det här projektet, det är superenkelt att göra tillsammans med barn och askarna kan se ut precis som man vill. The sky is the limit - och så vidare.


Now it's up to you to get creative and make some boxes. Good luck! Tomorrow it's Rebecca's DIY who continues the crafting relay. Exciting!


Nu är det er tur att vara kreativa och göra askar. Lycka till! I morgon är det Rebeccas DIY som fortsätter Pysselstafetten. Spännande!


Friday, October 5, 2012

Crafting relay: DIY Paper fall asters | Pysselstafetten/Gör-det-själv: Höstastrar av papper

Today is a big day, because today it's my turn to participate in the crafting relay organized by Pysselstafetten. Thanks Clara at Innerligen by Clara for showing the really lovely pillows made by scraps of fabric yesterday! I might actually have to try that one day. But today we'll cheer up this rainy fall with happy colorful fall asters!

Idag är en stor dag, för nu är det min tur att ta över stafettpinnen i pysselstafetten som Pysselstafetten organiserar. Tack Innerligen by Clara för att du visade de snygga kuddarna av tygrester igår! Det måste jag nog prova någon dag. Idag ska vi dock muntra upp den här regniga hösten med glada färgstarka höstastrar!


Let's start the tutorial:


First, gather colorful tissue paper. In whatever colors you like.

Först tar du fram färgat silkespapper. I vilka färger du vill.


Cut three squares that are 3x3 inches.

Klipp ut tre fyrkanter som är 8x8 cm.


Fold once.

Vik på diagonalen en gång.


And once more.

Och en gång till.


And again, always keeping the "open" side on top.

Och igen. Den "öppna" kanten ska hela tiden vara uppåt.


And once more.

Och igen.


Cut away the paper so that the edge is straight.

Klipp av pappret så att överkanten är rak.


Cut along the lines (but don't draw on your paper, it'll leave ugly marks).

Klipp längs linjerna (men rita inte på ditt papper, det blir fula märken).


It'll look like this. (I really should have painted my nails before doing this tutorial. Sorry.)
Repeat with the other two paper squares.

Då ser det ut så här. (Jag skulle verkligen ha målat naglarna innan jag gjorde denna tutorial. Ledsen.)
Gör samma sak med de två andra pappersfyrkanterna.


Put the papers on top of each other, and add a little glue in the middle.

Lägg papperen ovanpå varandra och sätt lite klister i mitten.


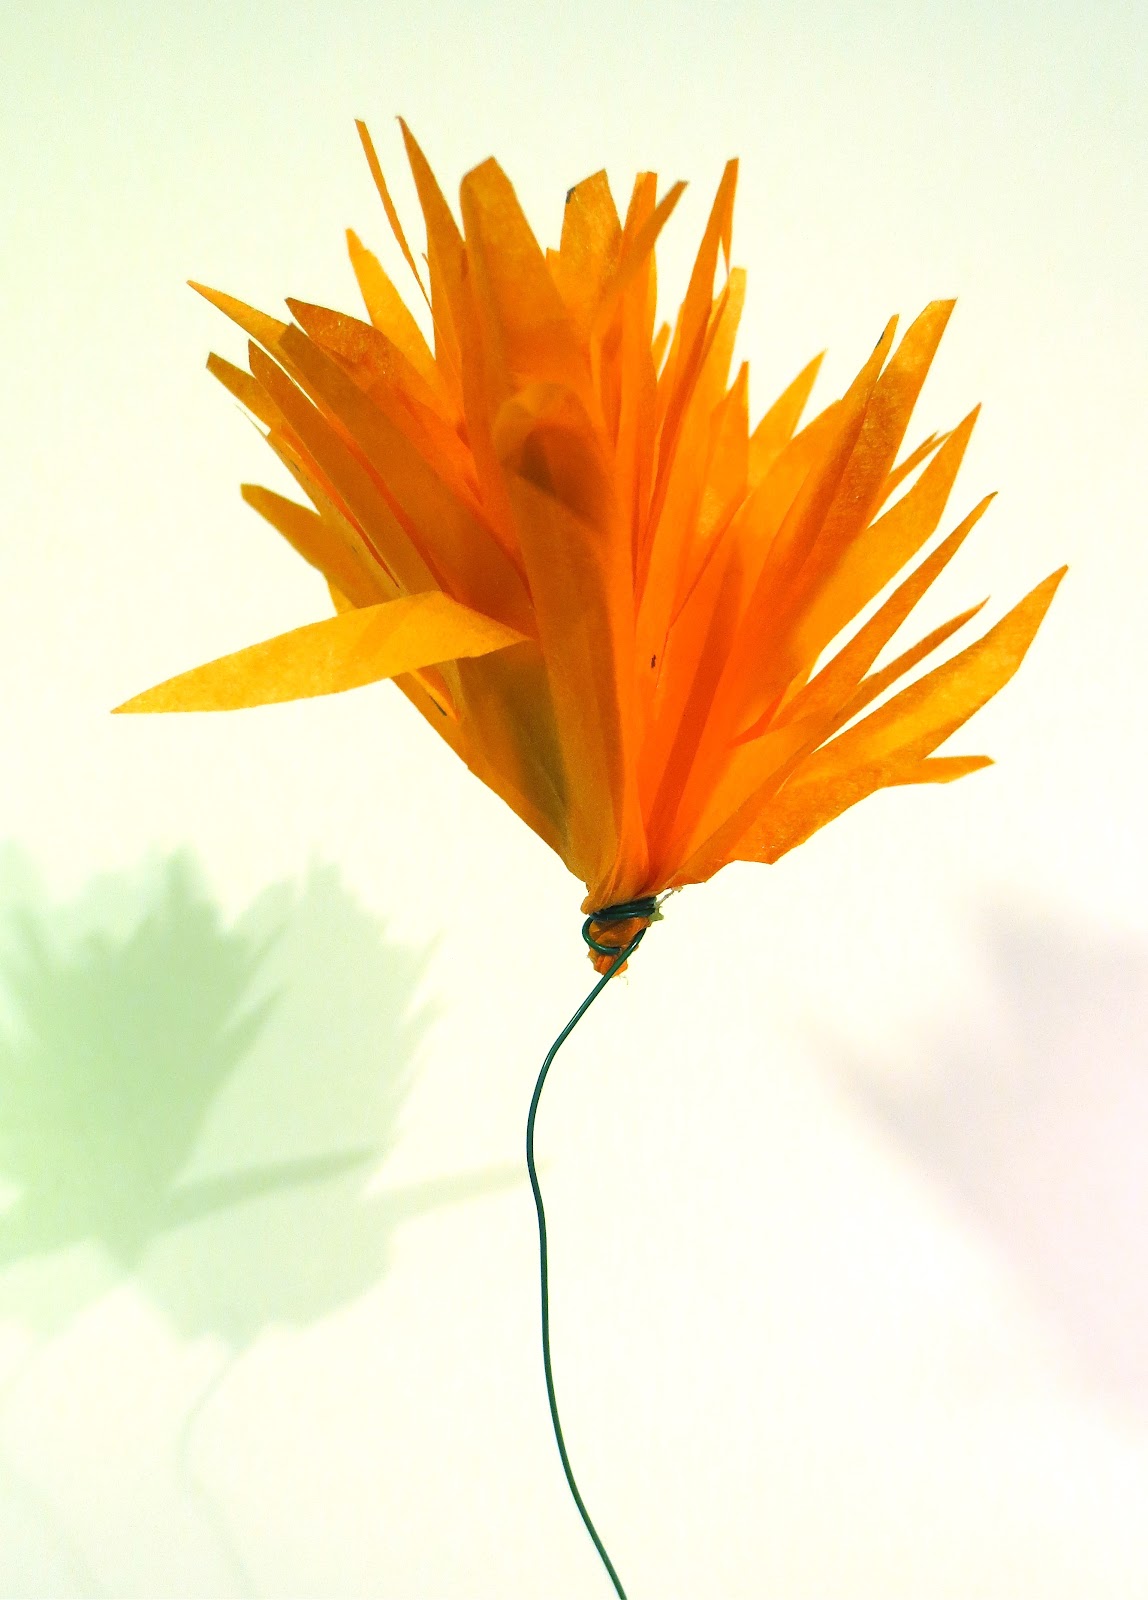
Press at the bottom of the flower (where it should meet the stem). Put a wire through the papers and the glue. Make a little loop at the end of the wire.'

Tryck ihop botten på blomman (där stjälken skulle suttit). Dra en ståltråd genom pappren och klistret. Gör en liten ögla i änden.


Pull the wire down so that only the loop is inside the flower. Twist the wire around the bottom of the flower.

Dra ner ståltråden så att bara öglan är inne i blomman. Snurra ståltråden några varv runt botten av blomman.


Adjust the petals to make them look nice and flowery.

Justera blombladen så att de blir fina och blomlika.


If you'd like a sturdier stem, you can twist the wire around itself. And maybe add a leaf made out of crêpe paper? Secure the leaf by twisting the stem around it once. Done!

Om du vill att stjälken ska vara stadigare kan du vira ståltråden runt sig själv nerifrån och upp. Och kanske sätta dit ett blad av crêpepapper? Sätt fast bladet genom att vira stjälken runt det en gång. Klart!


You can put the flowers on a string...

Du kan sätta blommor på ett snöre...


 ...or put them on your fridge (if you'd like to put them on a string or your fridge, you might want to skip the wire and secure the flower bottom with a piece of washi tape instead. Just attach the flowers to the string or to small magnets with more tape.)...

...eller sätta dem på kylskåpet (om du sätter dem på ett snöre eller på kylen kanske du ska skippa ståltråden och sätta en bit washitejp vid blommans botten istället. Sätt sedan fast blommorna på snöret eller små magneter med mer tejp)...


...or in something sweet...

...eller på något sött...


 ...or in your hair...
...eller i håret...


...or on your coat.
...eller på din jacka.

Wherever you like it, really. / Var du än vill ha blommorna, egentligen.


I'm sure you have more ideas of where to brighten up your day with paper flowers. Let me know! And also - don't throw away the small bits of tissue paper scraps. I'll show you what to do with that in a few days...

Tomorrow the crafting relay continues with Återbruk av Åsa Li in charge. Very exciting!

Jag är säker på att du har fler idéer på hur man kan lysa upp det mesta med pappersblommor. Berätta! Och också - kasta inte bort silkespappersresterna. Jag ska visa vad man kan göra med det om ett par dagar...

Imorgon fortsätter Pysselstafetten med Återbruk av Åsa Li. Mycket spännande!